 |
permits for concerts elegant 2013,
hairstyles soft 2013
 |

How to style a side scallop braid
.JPG) |
Step 1 : Set hair with setting spray and blow dry.
Step 2 : Add a few pieces of extensions for volume and height if needed.
Step 3 : Tease hair and brush over to one side.
Step 4 : Secure with bobby pins then twist pieces of hair back hiding pins.
Step 5 : Twist bangs back towards the pin and secure inward.
Step 6 : Braid hair and loosen side so it creates a scallop round shape. Pin the tip inward and under hair


Honey recipe to lighten hair away from pigments
 |
Components of the recipe:
1_ tbsp honey
2_ cup warm water
Method:
First: Mix one teaspoon of honey with a cup of warm water, and let the mixture for 30 minutes, then attack again
Second: using a brush Apply the mixture on your hair even Nglfa your hair well
Third: Choose a sunny location and sit in it for 20 minutes after that Tlfa hair with a plastic bag.
Fourth: Wash your hair and rinse with tepid water, or you can leave the mixture on your hair to Drahh lighten the largest and wash it off the next day.
If the result is not to your liking you can repeat previous Ktoat but with the increase in the proportion of honey every three or four tablespoons warm water and replace average Balbsam who were using.
A large assortment of attractive eye makeup

 |
Easiest hairstyle for beautiful occasions
 |
1 - we proceed Department Alharlqsameen
2 - Nida Bdfr the upper part of the hair to form a two conditions of Aldwirh in both sides
3 - must have you left part of the hair under the neck
5 - and then periodically two Aldwirh bands behind to the left on the right is over on the right, on the left Repeat the process with me the remaining Amském tapes pins
5 back for Almtiqi hair down the neck and begin to form a cake like in the picture and Taatpetha pins
6 - In the last you'll get Raaaaaaaúah hairstyle occasions
Bouffant Back Bun – Hair Tutorial
 |
Start by fitting your extensions, I’m putting my bouffant back bun quite low down so will fit them as normal but if you want to take this a little higher then you may need to flip your extensions. Once these are fitted secure your hair into a ponytail with your thick hair elastic.
Step Two:
Now you need to gather your hair together and secure the ends of your hair with the small elastic. If you have layers in your hair, make sure the elastic is holding all these in as we don’t want any to escape. You can add a little serum to the ends of your hair if you have flyaways.
Step Three:
Now you need to flatten your ponytail, downwards against your head and use you bobby pins hold this flat, you may need quite a few..but don’t worry as they will all be hidden.
Step Four:
Now you need to back comb your ponytail a little to bulk this up! Once you have done this holding the small elastic pick you your ponytail, folding this over the area you have just pinned down.
Step Five:
Now you want to tuck in the ends of your hair (and the elastic) and pin in place. Before pinning it may be worth checking that the backcombing has created the rounded shape to the hair and that the ends of your hair are not poking through! Once you are happy and this has been pinned all over add some hairspray for extra hold.
How to color hair new deviation 2013
 |
The second way - my cheeks part Assaar hair and رشيه Bardad water
The third way - soft cheeks disobeyed Tabashirofrckaha part of my father Rhite hair with water and Frcka chalk on a good hair Dhaba and forth Khariri process on the number of parts hair Almtiqih
Fourth way - have to prove hair color on my job portcullis and throw the Almajod part of the hair on the clamp after Dalk hair from the jaws clamp رشيه installer to get the full view of the distinct Being Aktar bolder


How To Make Elegant Crown Braid
 |
Step 1 : First hand-dry the hair with Surf Spray and then White Hair Powder to give it a roughed-up texture with lots of grip.
Step 2 : Create an exaggerated side part, then back-comb crown for a bit to added volume.
Step 3 : Isolate a large section of hair on the thick side of the part and braid into a traditional three-strand braid all the way down to the ends. Use a clear elastic to secure. Use fingers to gently pull braid apart so it’s wider. Rub braid with palm of hand to create a little bit of fuzziness.
Step 4 : Pull The hair into a ponytail by the nape of the neck, securing with a bungee hair-tie. Keep ponytail slightly loose to preserve volume. Back-comb length of ponytail for added fullness.
Step 5 : Tuck the tail of the braid into the chignon, securing with a bobby pin.
Step 6 : Fine-tune the hair with fingers and use hairspray all over the hair to set.

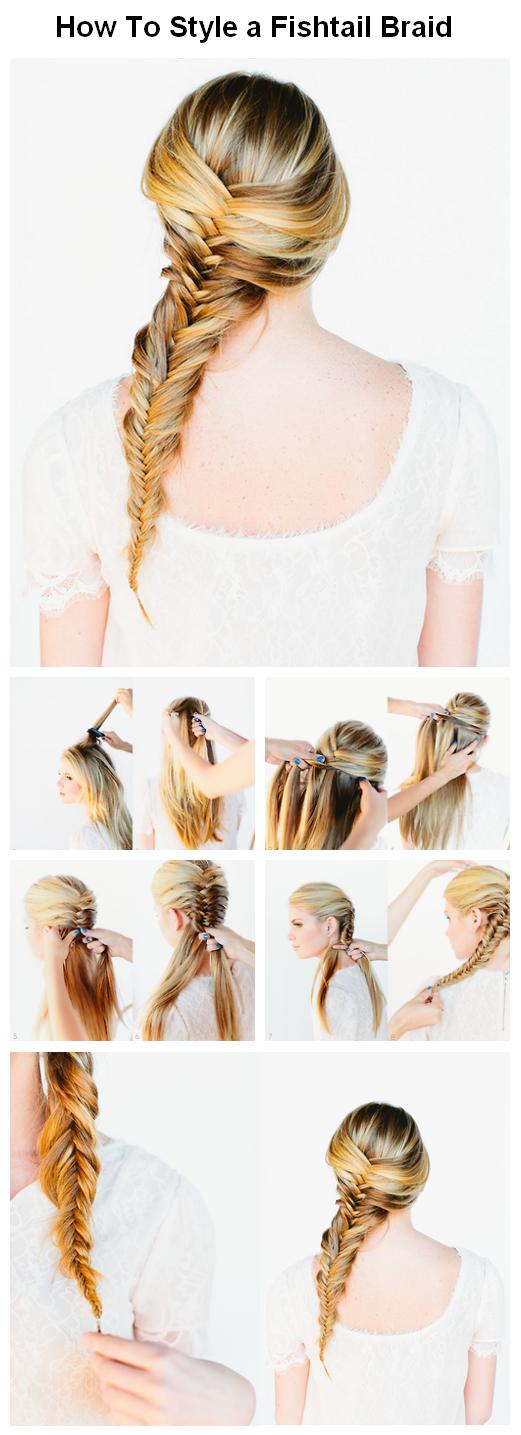
Fishtail Braid Updo hair Tutorial
 |
Step 1 : Gathering your hair to the side and secure it with a thin rubber hair tie. Divide it into two sections.
Step 2 : Hold both sections in one hand, separated by your pointer finger, and use your other hand to grab a small piece from the outside of one section.
Step 3 & 4 : Repeat step 2 until you’ve just about reached the end and secure it with an elastic. It’s even better if it’s messy, so pull out some strands and roughen up the braid a bit.
Step 5 : If you want to turn your fishtail into an updo, start by rolling the braid inward and up towards the nape of your neck.
Step 6 : Secure the rolled bun with bobby pins. The looser and messier the bun, the better!

Make A Ponytail With Twists For Your Hair
 |
Divide the small section of hair on your left into two pieces.
Cross the hair over and twist. Repeat this one or two more times so that you have the start of a tight, thick twist.
Grab a vertical section alongside your twist.
Add it into the twist, crossing over and around the first two strands.
Continue incorporating vertical sections and twisting until you get to the opposite side of your head. Grab hair into a ponytail and secure with an elastic.
Take a piece of hair from your ponytail and wrap it around the hair elastic to hide. Tuck it into the ponytail and pin it in place with a bobby pin.
From the side it looks like a super-cool, beach-ready ponytail ... But from the back you see the pretty twists that keeps the look girly and sweet.
Wedding Hairstyle Inspiration
 |
1. Backcomb/tease the crown of your head. This makes the hair “sticky” for starting the fishtail.
2. Gather a small handful of hair from the back center of the head and separate the hair into two sections.
3. + 4. Take a small strand of hair from the right section, pull it back and cross it over to join the left hair section.
5. + 6. Take a small strand of hair from the left section, pull it back and cross it over to join the right hair section.
7. Repeat these steps all the way down the back of the head. Continue throughout the “tail”.
8. Secure with hair tie. Fishtails looks beautiful a little disheveled. To achieve this look gently pull apart/loosen the braid. It’s ok if it’s uneven or little pieces falls out. Gives the fishtail a youthful, messy ease.

Make A Wedding Hairstyles for Long Hair
 |
How To Style :
Step 1 : Starting at the root, begin to curl hair, twisting the hair, and adding more until the entire iron is covered with hair.
Step 2 : Gather the curled section and pin with metal clip.
Step 3 : Continue to do this to the bottom section, moving up through the entire head, until the head is completely set. curl the front away from the face, to achieve a softer, modern look.
Step 4 : Let hair set for 20 minutes, spray lightly with hair spray.
Step 5 : Start releasing the hair from the bottom up, keeping the curl intact as you go and spray hair, lightly, after all the curls have been released.
Step 6 : Gently, with your fingers, pull through the end of the hair to soften and release the curl. and you are done!
How To Make a Chignon Bun
 |
1 : Gather all of your hair in one hand.
2 : Start twisting all of your hair in your hand around 1-2 fingers. Hold your starting point in your other hand as if it were a hair tie (if you have hair that is thick and slippery you may just want to put a hair tie in.
3 : Continue to wrap your twisted pony around your starting point until you reach the end of the pony, continually twisting your finger at the same time to keep the ponytail tight.
4 : Secure the end of your pony with a bobby pin, making sure that it goes as far in towards the center of the bun as possible.
5 : Add extra bobby pins to ensure that the bun will stay in place. I usually use about 3-4, if you have thicker hair or many layers, you may have to use more.
6 : Toussle your hair slightly to give it a 'messy, effortless' look and sprits it a few more times with some hairspray or styling product if needed.


Messy Side Ponytail Tutorial
 |
1. First, start by pulling all of your hair to the side, rolling it in as you go.
2. Second, put your hair in a ponytail. On the last loop of the elastic hair tie, don’t pull the hair all the way through.
3. Three, loosen the loop of hair to make it “messy.”
4. Finally, push the loop of hair up to the side of your head. Twist a bit and pin into place with 2-3 bobby pins.
DIY hairstyle: knotted milkmaid braid.
 |
my pinterest addiction can be summed up in pins about hair. it makes sense considering that for the past 5 years i've worked for a salon, surrounded by copious amounts of hair, ladies obsessed with hair, photos of hairstyles, hair products... you get the picture.
hence, i wanted to try something different than the stereotypical plait, waterfall braid, etc, etc. [i.e. the same styles everyone else is wearing]
warning: this is not your traditional milkmaid braid considering there's no actual braiding involved. perhaps the "knotted milkmaid faux braid" would be a more appropriate title! ;)
steps: choose which side of the head to begin your knots. on that side, select two equal sections of hair just above the ear and tie a knot pulling upward. moving up [and eventually around the crown] carefully add more hair to either section and repeat the knotting process. continue around the head until you've reached the opposite ear. secure with a couple bobby pins and... voila, you're done!
in need of more hair inspiration? check out my other hairstyle tutorials here!
How To Do A Twist Braid
 |
Step 2. Backcomb the entire section.
Step 3. After it's backcombed use the comb to smooth down the top layer so it doesn't look ratted.
Step 4. Start by taking a thin section (about 1/4 inch) off of your part and splitting it in half.
Step 5. Twist the front half over the back half, so the back half is now in front.
Step 6. Take another thin section (just like the first one) and add it to the front piece.
Step 7. Now just repeat the last two steps for the remainder of the twist braid - twist the front piece over the back piece, add a new hair to the front piece, twist it over the back piece, etc.
Step 8. Secure it by inserting bobby pins up and inwards in the end of the braid.
There you go! She makes it look so easy! :)
And here is Steph's latest video tutorials (I love her videos because they are so clear and easy to understand! They make me feel like even I can make my hair look good!):
Eyeko Vampira Polish....Turned Funky
 |
So I did this mani about 2 weeks ago, and just loved it. I only have a few Eyeko polishes, but thi s is my fave!!
I decided that it needed something extra.....So I decided to do a matte tip & I'm so glad I did. I love it even more now! The Matte is OPI's Lincoln Park After Dark Matte.
Scotch Tape Stripes......
 |
Then I taped off my nails, and did Sinful's Black on Black & another coat of SV
For my final step, I taped them off again, and added China Glaze Limbo Bimbo, hee hee, and my final coat of SV :)
The Floral Mani Art Tutorial
 |
- Take your dotting tool, dip it into the color of your choice and create small little blobs of paint. These will be the base of your flowers.
- Take your striping brush and carefully paint an inside circle of each flower a darker shade. Let dry.
- Dot small black circles in the middle of each flower.
- Add leaves to each flower. Let dry, then complete with a top coat. And you're done!
Colorful Nails Stripes!
 |
- get yourself some striping tape. eBay sells rolls of 10 for about $3.
- paint whichever colors you want to show through the stripes, it can be one color or various. Let dry very well.
- lay down your striping tape. You can create lines in whichever direction you want.
- apply your second color all over the nail, make sure it's an opaque one coater.
- immediately remove your striping tape whilst the polish is still wet.
- Apply your top coat and you're done!
Subscribe to:
Posts (Atom)