NEW YEARS NAILS


How To :
Start with any polish color you want. We used black so you could really see how it’s done. Let it dry really well. You can even put a thin topcoat over it if you want so it doesn’t smudge when you add the glitter.
Using your dense glitter polish and a super-thin art brush, lay down a line of glitter polish at the tip of the nail. (Or you can do the moons if you’d rather.)
Using the thinnest art brush you can find, drag the glitter polish out carefully. You don’t need to drag too much of the glitter because you want it to fade to almost nothing. Only go about half the length of the nail.
After you’ve dragged it out, go back in and lay down one more line of glitter polish at the tip to make it look more dense.


MANIC MONDAY: NEW FAVORITE

How To :
A few days ago I was in one of those fun paper stores when I saw the new gold + silver Sharpies. Of course I bought them. Thought I would give them a try on my nails and see if they would stay put when a top coat was added. BOOM. My new favorite nail art tool was discovered. It came out even better than I had imagined. It’s really hard to get a super-reflective gold paint for accenting your nails– particularly one that’s easy to use. This is one of the easiest applications ever because everyone knows how to use a pen. I don’t really love the nail art pens because I find that the polish separates and it can come out “chunky” after a couple uses. So glad I stumbled upon these gems! Here are a couple of things you should know: READ MORE…


How To Pin And Curl An Updo Tutorial


How To :
- Take the top section of your hair in a horseshoe shape and pin it up.
- Separate your hair into three equal sections.
- Take the center section of hair, create a loop and pin the loop to your head so that it secure. I have a lot of hair, so I had to do two loops.
- Take one side of loose hair and pull back. Create another loop and pin it to the rest. Repeat on the opposite side.
- Take the top section down and backcomb the crown, using even strokes.
- Take the section you just backcombed and brush out the top, smoothing just the top layer. Then curl and pin, leaving volume at the crown.
- Curl and pin the remaining sides into the center. I crossed the back two curls over the middle one, to hide those bobby pins.
- Spray with hairspray and add any additional pins to make sure your hair is secure.


Double Braid Bun Hair Tutorial


How To :
- Pull your hair into a high ponytail.
- Split your ponytail into 2 sections, braid, and secure with a very thin hair tie.
- Make sure both braids are secured with small hair ties before moving on to the next step!
- Twist the braids around the top of your ponytail, bobby pinning them as you go.
- Finish with hairspray!


The Flower Bun Hairstyle


How To :
- Part your hair the way you like, then separate a one-inch section of hair at each temple and clip those sections out of the way.
- Gather your remaining hair at the nape of your neck.
- Then create two or three low braids, securing the ends with clear elastics.
- Twist each braid until it curls into itself; bobby-pin in place.
- Last, unclip and twist the two pieces by your temples.
- Pin under the braided bun or, for a slightly fancier flourish, tuck their ends into the bun before securing.


How to get Messy chunky beach waves


STEPS :
1. Starting underneath, Grab a small section of hair.
2. Twist the hair around your fingers ...
3. twist that section of hair all the way up to your head.
4. Grab your flat iron and heat the rolled hair. and hold it
5. Release the flat iron to reveal the random chunky curl.
6. Continue doing this all the curls over your head.
7. >When done, spray with hair spray to hold the curls..
8. Run your fingers through your hair to break up the curls.
9. Poof your hair up a bit and you're done.


Untidy Bun hair Tutorial


How To Style :
For this hair do, prepare the hair by applying the texturing product. To get the best look, your hair should have texture. Then tie up at the back of the head with a flexible hair band, either in the side, at high or in a low placement. Then cover the hair starting from the base of the ponytail in order to give it a bun look, and then secure it in a right place by using bobby hooks.


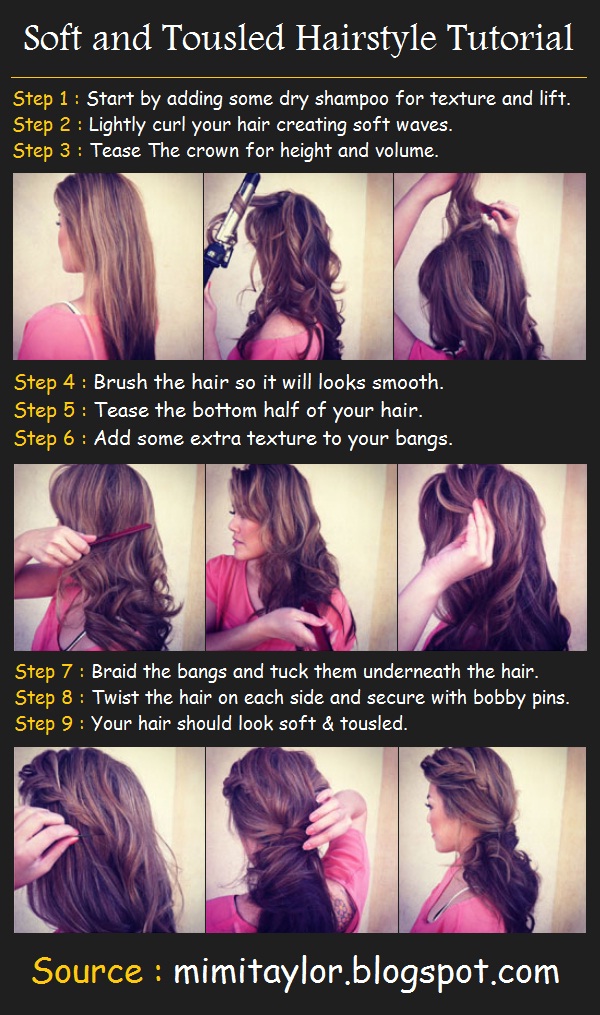
Soft and Tousled Hairstyle


How To Style :
Step 1 : Start by adding some dry shampoo for texture and lift.
Step 2 : Lightly curl your hair creating soft waves.
Step 3 : Tease The crown for height and volume.
Step 4 : Brush the hair so it will looks smooth.
Step 5 : Tease the bottom half of your hair.
Step 6 : Add some extra texture to your bangs.
Step 7 : Braid the bangs and tuck them underneath the hair.
Step 8 : Twist the hair on each side and secure with bobby pins.
Step 9 : Your hair should look soft & tousled.


How To Do a Messy Top Knot

How To :
- First put your hair into a high pony tail, relatively tight, but don’t pull all your hair all the way through.
- Take half of the hair left hanging down and twist and pin it in the front.
- This will cover the pony tail holder. Do the same thing with the other side.
- Pin down parts of the middle part of the pony so it isn’t sticking straight up.
- Then pin some down in the back so the other part of the pony tail holder isn’t showing and you’re done!


Bead And Chain Bracelet DIY


What you’ll need:
30cm Gold Chain (Chains with medium size links work better)
31cm Gold/Brass Jewelry Wire (I used 0.44mm size wire)
25 Gold Pearl Beads (I used 5mm size beads by Jewelry Essentials from Michael’s)
Jump-ring & Clasp
Jewelry Wire Cutter or Scissors
Pair of Jewelry Pliers

Braided T-Shirt Bracelets DIY


You’ll need : Cotton or jersey T-shirt you don’t mind cutting up. 1 yard of rattail cord for each bracelet. Magnets. Glue. Either hot glue or tacky glue or both.


How To Style a Chignon Bun Hairstyle


How To Style :
Step 1 : Gather all of your hair in one hand.
Step 2 : Start twisting all of your hair in your hand around 1-2 fingers. Hold your starting point in your other hand as if it were a hair tie (if you have hair that is thick and slippery you may just want to put a hair tie in.
Step 3 : Continue to wrap your twisted pony around your starting point until you reach the end of the pony, continually twisting your finger at the same time to keep the ponytail tight.
Step 4 : Secure the end of your pony with a bobby pin, making sure that it goes as far in towards the center of the bun as possible.
Step 5 : Add extra bobby pins to ensure that the bun will stay in place. I usually use about 3-4, if you have thicker hair or many layers, you may have to use more.
Step 6 : Toussle your hair slightly to give it a 'messy, effortless' look and sprits it a few more times with some hairspray or styling product if needed.
There you have it, your easy 'I'm going shopping and look great doing it' look.


Braided Headband Hairstyle


How To :
- Pull a section from the front of your head away from the rest of your hair.
- Braid the entire section of hair.
- Take the braid and wrap it around your head. Pin it to the side of you head with a bobby pin.
- And you're done!


How To do a french braid hairstyle


French Braid Hairstyles go really well with medium or long hair and give you a classic and neat hairstyle.


The Boho Chic Ponytail


How To :
- Curl the top layer of hair with the rest of your hair messy/curly. Mine was kind of curling from no heat curls the night before.
- Tease your hair starting just past your bangs on top, back to where you will secure your ponytail
- Gather your hair in place where you want it, not tight at all, and secure with an elastic.
- Pull tight, then pull out strands as needed to create a “messy on purpose” type of look.
- Wrap an extra piece of hair around the elastic.
- And You’re done!


How To Make Three Braids

How To Make Three Braids

A Half Moon Manicure


How To :
Step 1 : In broad, even strokes, apply a thin layer of your favorite base coat.
Step 2 : Apply two coats of polish to the bottom half of your nails. Make sure your nails are completely dry before you move to the next step.
Step 3 : Paint a line with your black polish that mimics the shape of your natural lunula.
Step 4 : Paint the rest of the nail with your polish. For a more even and opaque coverage.
Step 5 : Since you don't want your nail colors to bleed into one another, allow 15 to 20 minutes of drying time before you apply top coat.


Pink Ombre Nails Tutorial


How To :
Step 1 : Choose a colour gradient from the same family that would work together for an ombre.
Step 2 : You’ll need a makeup sponge. Soak it in water and wrench most of the water of it. Keep the sponge a little moist – the wetter the sponge is, the slower the polish dries on it.
Step 3 : Sponge the colour onto your finger nails. Don’t worry too much about getting it on your skin; you can clean it off with remover afterwards.
Step 4 : Keep reapplying polish onto the sponge and pressing down until you get the desired effect.
Step 6 : The finished product after top coat and nail polish remover.


Music Note Nails tutorial


a list of what you will need:
.A light colored base nail polish
.Black nail polish with a thin tipped brush
.Dotting nail tool, which can be found at any beauty supply store or at Sephora for 3 bucks.
.Oh, and don’t forget to paint your nails with a clear topcoat once you’re finished.

The Newspaper Nails Manicure


How To Do :

Step 1 : Apply a thin layer of your favorite base coat. Then, apply two coats of any polish i.n a light to medium shade.
Step 2 : Find any newspaper on-hand. Cut ten 2" x 1" strips (one for each nail), and set aside.
Step 3 : Dip the whole nail into a small bowl of rubbing alcohol. Then, dip one newspaper strip into your small bowl of alcohol and shake it out.
Step 4 : Overlay that newspaper strip directly on the nail bed and don't move!
Step 5 : Take an alcohol-dampened paper towel and apply light pressure on the nail like a temporary tattoo.
Step 6 : After 10 full seconds, slowly peel off the strip and you'll see the ink imprint. Repeat this process for each nail.
Step 7 : Allow nails to dry again for five full minutes, then seal the deal with your favorite top coat

Christmas Tree Nails Design


How To :
- Paint your nails a plain base color. Let dry. Using tape, create a small triangle on your nails. Paint the inside of the triangle with green polish. This will create the look of the Christmas tree!
- Peel the tape away from your nail after you’ve painted the middle. This reveals your little trees!
- Using glitter polish, create the look of little Christmas lights! Add a star on top by placing a small gem at the end of your tree.

Make Inside-Out Half Up Braid


Steps
Step 1: Gather a small section of hair on one side to begin the inside-out braid.
Step 2: Continue weaving the sections of hair under the braid.
Step 3: Continue braiding down the side of the head.
Step 4: Braid until you reach the center of the back of the head.
Step 5: Securely bobby pin the braid to the center.
Step 6: Begin the inside-out braid on the opposite side.
Step 7: Continue braiding until you meet the other braid at the back.
Step 8: Securely pin the braids together. Curl as needed!


How to Create This Elegant French Twist


Steps
1. Start with dry or damp hair. Hair can be curly or straight.
2. Comb through hair with your fingers and pull it all over to the desired side.
3. Take your hair into one hand like you are going to create a low side ponytail.
4. Twist hair forward (towards your face) starting with the hair behind your ear, from the roots. Twist hair a couple inches down the ponytail. I stopped mine just below the earlobe.
5. Now secure the twist with bobby pins. Place pins at the base of your twist where the hair is folded in at your scalp. For the best hold, take the lip of the pin and push it in and away from the twist, then push it back into the twist, up against your scalp. This will tightly secure your twist. Set the style with your favorite hairspray and prepare to turn some heads!


How To Do a Ballerina Bun Hairstyle


How To :
- If your hair is straight, curl the ends with a curling iron. This prevents little hairs from poking out of your bun!
- Gather your hair into a ponytail on top of your head.
- Pull your hair through one last time, but only half way! Take the loop you’ve created and spread it out.
- Take the end of your ponytail and wrap it around the base of the bun.
- Secure with bobby pins.
- Finish with hair spray! See, that wasn’t so hard!

How To Style a French Braid Headband


How To :
- Use a wide-tooth comb to detangle the hair. Use a fine-tooth comb to draw a horizontal line across the crown from the top of one ear to the top of the other ear.
- From the line, comb the hair forward to the face. Pull the hair in back of the line into a ponytail holder or jaw clip so it stays out of your way. Choose which ear you want the brain to start from.
- Begin making the braided headband using the hair in front of the part. French-braid (see French braid slide) tightly across the crown and down to the other side, gathering small (1/4- to half-inch) sections from above the part. Once you’ve reached the other ear, secure the braid with a ponytail holder. If you like, tuck it behind the ear and pin it in place with a few bobby pins.
- Remove the ponytail holder or jaw clip you used earlier and style as you like.


Createing soft curls with your straight iron

Creating soft curls with your straight iron


How to do a Funky French manicure Nails Art Tutorial


Steps :

1.First you paint your base color, this can be ANY color you want.
2.Then take scotch tape, and stick it to your palm. so it takes away some stickiness, and doesn't pull up the base color.
3.Then tape it onto your  nail, in the desired design.
4.Once you have it right, you can paint your nail with the other polish color.
5.Once you're done, painting the nail, just slowly pull the tape off.
6.Then do this to the rest and Ta-Da, you’re done.

a simple tape Stripes nail manicure Step-by-Step


Steps :

1.Basically all you have to do it paint your nails a base color.
2.wait for it to dry completely. And I mean, completely because if you don't the base color will peel off.
3.To create the stripe pattern, cut some scotch tape into thin strips with some scissors. Apply in any pattern you like.
4.Make sure to press down on the tape to make sure it is secured.
5.Paint the second color on top and pull off the tape immediately.
6.Let the polish dry, then apply topcoat and you are done!


a Simple Double Funky French manicure Nail Art Tutorial


Steps :
1.apply your base coat, then follow with 2 - 3 coats of your base color.
2.Once completely dry, apply "french manicure stickers"to each nail.
3.You should use two nail strips per nail, leaving space between the two strips.
4.Apply your second color until opaque - usually only takes one coat if you are using a dark color.
5.Remove "french manicure stickers" immediately, let dry, then apply your top coat.
"french manicure stickers" mean those little guide stickers that you can buy in the nail section of any drugstore.

Color Block Nails Tutorial


Learn how to color block your nails! This is a quick and easy nail tutorial that can be done on all nail shapes & lengths :)

a Simple Scotch Tape Rays manicure with step-by-step tutorial


Steps :
1.Cut 5 VERY thin strips of scotch tape.
2.Then I placed them on your nail. start with one down the center, then placed the 2 next to that, then the other 2. Just make sure you rub the tape, a little hard, to make sure all the strips are completely down.
3.Once you're certain they are all in place, polish your top color on
4.Remove the tape as soon as painted.
5.Then add your top coat, and Ta da, you're done!!

Make A Retro UpDo

How To Make A Retro UpDo


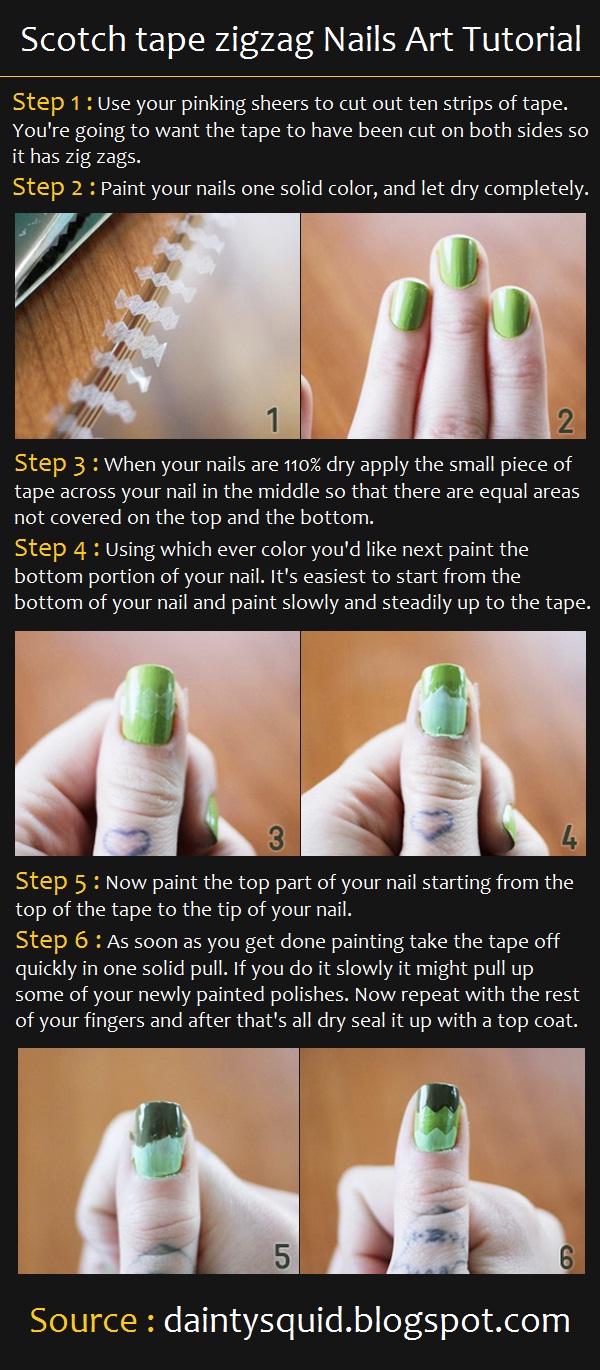
Scotch tape zigzag Nails Tutorial


How To :
- Use your pinking sheers to cut out ten strips of tape. You're going to want the tape to have been cut on both sides so it has zig zags.
- Paint your nails one solid color, and let dry completely.
- When your nails are 110% dry apply the small piece of tape across your nail in the middle so that there are equal areas not covered on the top and the bottom.
- Using which ever color you'd like next paint the bottom portion of your nail. It's easiest to start from the bottom of your nail and paint slowly and steadily up to the tape.
- Now paint the top part of your nail starting from the top of the tape to the tip of your nail.
- As soon as you get done painting take the tape off quickly in one solid pull. If you do it slowly it might pull up some of your newly painted polishes. Now repeat with the rest of your fingers and after that's all dry seal it up with a top coat.

A Simple French Manicure


How To :
First you need : Base coat - China Glaze. Polish 1 - American apparel, Polish 2 - Essie, Muchi Muchi, Top Coat - OPI
- Start with two dry coats of polish 1. Using polish 2, paint horizontally along the tip of your nail. Stop half way across.
- Repeat working from opposite side of nail creating a thin black tip the width of your natural nail white.
- Allow black tips to dry and apply top coat.


Knotted Braid Hairstyle


How To :
- Separate the section of your hair that you’d like to braid into two sections.
- Knot the two pieces, just as you would knot a piece of string or a shoe lace!
- Continue to knot your hair, pulling tightly after each knot.
- Pin the end of your braid with a bobby pin(s).
- And all finished! You can also create a dressier hairstyle by pulling the rest of your hair into a low bun

The Flip ponyTail Hairstyle Tutorial


How To :
- Gather the hair into a low ponytail at the nape of the neck and secure it with a ponytail holder.
- Then push the band down slightly to leave two or three inches of hair above it. Using your pointer and middle fingers, make a “hole” in the middle of the hair above the ponytail holder. With your other hand, flip the end of the ponytail under and up through the hole. Slowly pull the ponytail through. If the ponytail sticks out from the head too much, gently pull the holder down farther to relax the style.
- Brush the ends of the flip tail smooth.


A Tousled Topknot Hair Tutorial


How To :
- Using just your hands, rake the front of hair to one side (to get the soft swirl), then loosely pull your hair up into a high ponytail and tie it with an elastic band.
- Wrap the length of the pony around the base of the elastic (be sure to leave a piece of hair out in the back for the braid). Tuck in a few hairpins around the base to keep it in place.
- Shape: Braid the piece of hair you left out and wrap it around the base of the bun. Secure with U-shaped pins. Finish with a spritz of hairspray all over for hold.

Strawberry Inspired Nails


How To :
- Paint your nails red!
- After the base coat is dry cut ten strips of tape using your pinking sheers. Firmly apply one piece per nail.
- Apply the green polish on the area you left un-taped for the leaves.
- Gently, and slowly pull of the tape. I find my nails turn out best if I take the tape off immediately after painting instead of waiting until my whole hand is done.
- Using your nail art pen or a tooth pick and black nail polish randomly place polka dots on your nails.
- After everything is dry, add a top coat!


Clear Micro Beads Nails Tutorial

SHANY Nail Art Set (24 Famouse Colors Nail Art Polish, Nail Art Decoration)$25.00
How To :
Step 1 : apply a clear base coat on completely bare nails.
Step 2 : apply one coat of no-shimmer white polish onto your nails and let them dry.
Step 3 : Apply a generous second coat of color to one hand, and let the polish get tacky for 10 seconds.
Step 4 : over a sheet of paper, a cup, or a plastic tray, pour the microbeads over your nail bed, ensuring you coat the entire surface of your nail bed like glitter over glue.
Step 5 : use the pad of your finger to press and secure the caviar beads.
Step 6 : then apply a tiny drop of top coat along your nail tip to seal the Clear

Explosion Nail Art Design


How To Do :
Step 1 : Start with the base color you like and let it dry completely.
Step 2 : while waiting for the base color to dry. cut some triangles out of tape to make the 'explosion' shape.
Step 3 : Now place the triangles one by one, next to each other on one corner of the nail, in a slight curve. This will create the 'explosion' shape.
Step 4 : Then apply your first layering color with a thin coat and carefully peel off the pieces of tape right away.
Step 5 : When the polish is entirely dry, you can start the taping process once again with your second layering color.
Step 6 : Apply your second layering polish and remove the tape strips as soon as possible. At last apply your topcoat, clean up and you're done!

Easy Breezy Beach Waves Tutorial


How To :
1- Start with wet hair and a great product to help work some wave into your mane. ===> Paul Mitchell's Ultimate Wave Beachy Texture Creame-Gel really does the trick for my hair. I also use their Twirl Around Crunch Free Curl Definer when I need some extra curl.
2- Next just scrunch your hair a few times. Not rocket science, I know.
3- A little blow drying with a diffuser makes it extra luscious. Tousle your waves and that's really all there's to it.

Styling a Textured Ponytail Tutorial


How To Style :
Step 1 : Create volume at the crown of your head by backcombing with a round brush,
Step 2 : Spray your entire head with hair spray, to keep volume from deflating.
Step 3 : Grab two large pieces of hair at the temples and cross one over the other so they end up on opposite sides of the head again.
Step 4 : Start creating a fishtail braid, making sure to add pieces from the hair that’s hanging down as you go. Continue this until all of your hair is gathered into a single ponytail.
Step 5 : Secure the ponytail with a very thin elastic.
Step 6 : Take a piece of hair from the back of your ponytail and wrap it around the elastic to keep it hidden.
Step 7 : Pin the end of the hair behind your ponytail with a bobby pin.


Tousled Curls Hair Tutorial


How To :
- Start with straight-ish hair. It doesn’t have to be perfect, Second day hair holds better.
- Grab a section of hair about 2 inches wide. If your hair is thick, grab less. Thin, grab more. Run a little bit of pommade onto the section with your fingertips.
- Open the tongs of your curling iron (the hotter the better), and wrap the lower half of your hair around it, curling away from your face.
- Repeat the same exact procedure for the next chunk of hair, but this time, curl toward your face. Continue like this around your head, alternating directions with each loose curl, until all sections are curled.
- Separate the large curls out using the back end of a comb or your fingers. Pick them apart until they look almost messy.
- And you're Done!

Glamorous Red Lips Tutorial

getting a perfect, authentic pout is an essential part of vintage style. If you look at any picture of a 1940s movie star or pin-up girl, and take away the hair and clothes, they still have a period look, and it's got a lot to do with the shape of their lips! In this tutorial I show you all how to get that perfect 40s look. and how to get it spot on. This is a look that works equally well for pinups and glamorous 40s femmes fatales as it does for the girl next door - everyone wore their lips like this in the 1940s! Enjoy!

3D Heart Nails Art Design


How To :
1- After filing nails and waiting for your base coat to dry, paint one to two coats of your lightest color. Wait at least 30 minutes for the polish to dry.
2- Apply tape. you can use trimmed Scotch tape, or striping tape. You’ll need four pieces for every nail.
3- Alternating every other space, paint the triangles your second color.
4- Wait at least 10 to 20 minutes before removing the tape. You’ll be left with this design, which is actually pretty cool.
5- To create the hearts, use the back end of a paintbrush to create two small dots. You can also use a straight pin, bobby pin or dotting tool.
6- Create a V-shape underneath the two dots and fill in the center.
7- Wait for the hearts to dry and then apply a topcoat to seal in your design. Use a cotton swab dipped in nail polish remover to clean up the cuticles.

Smoky Eye Makeup Tutorial


Products Needed:
.Dark brown eyeliner
.Black eyeliner
.Dark Brown eyeshadow
.Charcoal eyeshadow
.Light brown or Pale eyeshadow